
|
|
| Configure > Port | Previous | Next |
Configure > Port or ![]() in the toolbox.
in the toolbox.
Graphic A: 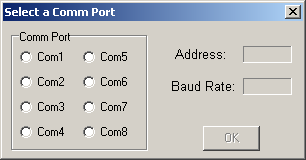
Selecting your port is the first step to begin using the DI-1000TC Configuration Program. When at any point in these instructions, the Address and Baud Rate fields fill in with data other than an error (as in graphic B), you have completed the Port step and are ready to click "OK" and continue the configuration process.
Graphic B: 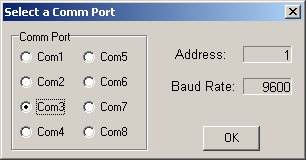
1. In the "Select a Comm Port" dialog box, you will need to select one of the four ports. Note: Ports 1 and 2 are your RS-232 ports. All other Ports are usually modem and/or USB ports.
2. If you do not know which Comm Port you are using, try port 1 or 2 if your DI-1000TC is connected via a RS-232 port. Try any of the other Ports if your DI-1000TC is connected via a USB port. Note: When using a USB Port it is important to know that Windows automatically assigns a Port that is not necessarily the next Port availabe on your PC. To find out what Port has been assigned to your USB module check your Windows Device Manager.
3. If you select the wrong serial port, the Address and Baud Rate fields will display "Error!" If this happens, you are connected to the other port. For example, if you are connected via a RS-232 port, and you get an error when you try Port 1, you should be able to conclude that you are connected to Port 2. If you select the wrong USB port you will get the following error message box:
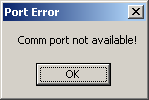
If this happens, you are connected to another Port. You can either check your Windows Device Manager to see which Port you are connected to or you can try each Port until you get the correct one.
If you try all ports and receive errors each time, your DI-1000TC is probably either not connected correctly or not powered up.
Once you click "OK", it may take a few seconds before the DI-1000TC starts scanning and then data will appear on your screen.